Buying vintage audio online is like finding buried treasure. You’re scrolling Facebook Marketplace at midnight, and there it is, a beautiful vintage receiver for a price that seems too good to be true. The photos look perfect. The seller says “works great” or “just needs some TLC.”
But here’s what I know from 45+ years in the vintage audio repair business: those words are code for something else. When you’re buying vintage audio without knowing what to look for, you’re taking a serious risk. I’ve seen people spend good money on units that looked perfect in photos but had major problems underneath.
After 45+ years, I can spot the warning signs instantly. The red flags that separate a real find from a money pit. If you’re buying vintage audio, you need to know these. Here they are.
RED FLAG #1 When Buying Vintage Audio: “I Don’t Have Speakers to Test It”
When buying vintage audio online, you ask the seller, “Does it actually work?” They come back with: “Well, I don’t have speakers to test it, but I’m pretty sure it does.”
They don’t know if it works.
This is one of the biggest problems when buying vintage audio sight unseen. A receiver that won’t power on looks identical to one that works fine from the outside. Same with one that has a shorted output that will blow your speakers if you plug them in. You can’t tell the difference without actually testing it. That’s why testing matters so much when buying vintage audio.
What to do: Before you commit to buying vintage audio from someone, ask the seller for a video showing it powered on and producing sound. This saves you time and travel. When buying vintage audio this way, video proof is non-negotiable.
Most meetups for buying vintage audio happen in safe public places: a parking lot, police department, or somewhere neutral. You won’t be able to test anything there. So think ahead before you go. If a seller won’t send you a video when you’re buying vintage audio, that’s a red flag right there. Walk away, or knock the price down hard because you’re buying something you don’t know anything about. It might work fine, or it might need serious work.
RED FLAG #2 When Buying Vintage Audio: The Mysterious Smell
When you’re buying vintage audio equipment, smell is one of your best diagnostic tools. If it smells hot, burnt, like melting plastic, or has that chemical smell of burnt resistors or leaking capacitors, stop immediately. Even pet smells or mildew are a major concern when buying vintage audio. That’s not just cosmetic: it’s a sign of serious internal problems.
That smell is your warning. Something inside is failing. Burnt resistors mean the circuit board is getting too much heat. Leaking capacitors are breaking down. Transformers overheat. When buying vintage audio, pet odors and mildew smells mean the unit was exposed to moisture and dander, and that gets inside everything. If you see rusted screws on the back, you’ll likely smell that mildew. Rust on the outside means corrosion on the inside too. This matters when buying vintage audio because moisture damage spreads.
What to do: Don’t plug it in. Don’t take it home. Don’t try to negotiate on price, thinking you’ll fix it later. The repair cost will be serious, and you’ve just invited a potential fire hazard into your house.
RED FLAG #3 When Buying Vintage Audio: Humming or Buzzing Sound
A properly functioning vintage receiver should be mostly quiet when it’s on. Maybe a tiny hum, but nothing you notice. This is important to listen for when buying vintage audio equipment.
If there’s an audible hum or buzz, especially one that gets louder when you turn up the volume, that tells me the power supply or transformer is failing. This is a critical warning sign when buying vintage audio because it means major internal components are breaking down.
Some people think it’s “character.” It’s not. It’s a component about to fail. When buying vintage audio, don’t let anyone convince you that noise is normal.
What to do: Don’t ignore it. If the seller says, “It’s always done that,” when you’re buying vintage audio, that means it’s been broken the entire time they owned it. Walk away or price it significantly lower as a repair project.
RED FLAG #4 When Buying Vintage Audio: Cosmetic Damage That Hides Real Problems
When buying vintage audio, cosmetic condition tells you a lot about how the unit was treated internally. Beautiful exterior case, but all the knobs are missing. The faceplate is cracked. The back panel is corroded.
If someone let the cosmetics go that badly, what happened to the inside? This is the question you need to ask yourself when buying vintage audio equipment.
Corrosion on the back panel means moisture got in. That means corrosion inside, too. Corroded circuit boards don’t work reliably. And once corrosion starts, it spreads. This is especially concerning when buying vintage audio because internal corrosion can be hidden but deadly to performance.
What to do: When buying vintage audio, assume cosmetic neglect means internal neglect. Price your offer accordingly, or walk away entirely.
RED FLAG #5 When Buying Vintage Audio: Vague Answers About History
“Where was it stored?” “I don’t know, my cousin gave it to me.” “Has it ever been serviced?” “I have no idea.” These are the answers you don’t want to hear when buying vintage audio.
“When was the last time it actually worked?” “Probably a few years ago?” This is another major red flag when buying vintage audio online.
If the seller can’t tell you anything about where the unit lived or what its history is, you’re flying blind when buying vintage audio. You don’t know if it was in a basement (moisture damage), an attic (heat damage), or a garage (temperature swings that destroy capacitors). History matters when buying vintage audio equipment because storage conditions determine lifespan.
What to do: When buying vintage audio, assume worst-case storage conditions. Moisture, heat, neglect. Price your offer to account for that risk.
The Checklist for Buying Vintage Audio
Before you buy any vintage audio equipment, ask yourself:
Does it power on?
Does it produce sound from both channels?
Are the knobs smooth and responsive?
Does it smell normal?
Is there any visible corrosion inside or out?
Can you get any history of where it lived?
Does the seller know anything about it?
If you answer “no” or “I don’t know” to more than two of these, you’re buying a repair project. Price it accordingly.
We’re not trying to scare you away from buying vintage audio. Just keep in mind that any vintage purchase could lead to a repair. Know what you’re getting into before you hand over your money when buying vintage audio.
The Real Talk About Buying Vintage Audio
Most vintage audio deals that seem too good to be true are just that.
Someone is either hiding a problem, doesn’t know there’s a problem, or is hoping you won’t notice.
The people who sell working, well-maintained vintage equipment know what they have. They price it fairly. When you’re buying vintage audio from someone who knows their equipment, the deal reflects that knowledge. The deals that look amazing usually look amazing because something is seriously wrong.
Test before you buy when buying vintage audio. Get answers before you buy. Walk away if something feels off. These three rules will save you from expensive mistakes when buying vintage audio.
And if you do end up with a unit that needs work, bring it to someone who knows what they’re looking at. A diagnostic fee upfront will save you from a major repair bill you didn’t expect.
Ready to find quality vintage audio equipment that’s been properly serviced? Browse our vintage audio collection to see what properly serviced pieces look like. We know what to look for because we’ve been doing this for 45+ years.
Whether a vintage receiver is worth repairing depends on five things. Most people only think about one of them, and it’s usually not the most important one.
You found it at an estate sale. The case is pristine, and you’re convinced it just needs a little work. Then you plug it in, and nothing happens. Or it powers on, but there’s no sound, the knobs are stiff, something smells faintly hot. I hear this every week. Someone walks in with a vintage receiver, torn between what they love about it and what they don’t know about what fixing it will actually cost. The honest answer: sometimes yes, sometimes no. And the deciding factor isn’t what you think.
The Real Question Isn’t “Can It Be Fixed?”
It’s “Should it be?”
Almost anything can be repaired if you throw enough money at it. Old capacitors can be replaced, transformers can be rewound, and corroded circuit boards can be cleaned. But just because something can be fixed doesn’t mean it should be. I’ve been doing this for 45+ years, and the best repairs are the ones that make financial and practical sense.
Here’s How I Evaluate It
When someone brings in a receiver, I ask myself five questions:
1. What’s the actual problem?
There’s a big difference between a unit that won’t power on and one that powers on but sounds terrible. A bad capacitor? Fixable, maybe $50–200 in parts. A transformer that’s shorted out? That’s a different conversation. Parts alone could run $300–600, plus labor.
I need to diagnose it first. That’s why we charge a diagnostic fee. It’s not to nickel-and-dime you. It’s to give you real information before you make a decision.
2. What year/model is it?
A 1970s Marantz or Sansui? Those are built like tanks, and parts are often available. A 1990s budget model from a brand that went out of business 20 years ago? That’s a problem. If the power supply fails and the exact replacement transformer isn’t available, you’re looking at custom rewinding or expensive workarounds.
3. Is this a popular model?
Certain receivers are legendary. They hold their value. A Marantz 2270 or a Sansui 8080 is worth fixing because people want them, parts exist, and they sound incredible. A random no-name brand receiver? If it costs $400 to repair, and you can buy a working used version for $250, the math is simple.
4. What’s your emotional attachment?
I’m not being sarcastic. This matters. If your grandfather owned this receiver and you want to restore it, that’s a valid reason to spend more than the “logical” amount. Sentimental value is real value. But I need you to go in with your eyes open about what it will cost. If you picked it up because it was cheap and you thought you’d flip it, then we need to talk about the real repair cost versus resale value.
5. Can you actually use it when it’s fixed?
This one surprises people. I’ve fixed receivers where the output is only 15 watts, which sounds like nothing to modern ears used to 100-watt systems. Some units have no remote. Some have quirky features that nobody likes. If this costs $300 to repair, ask yourself honestly: Will I actually use it? Or will it sit in my closet?
Here’s What It Typically Costs
Let me give you real numbers based on what I see every day:
Simple repairs (cleaning, loose connections, minor part replacement): $50–150 These are usually old capacitors that are losing effectiveness, or switches that need cleaning Quick turnaround, big improvement in sound quality
Moderate repairs (capacitor replacement, tube replacement, minor board work): $150–400 You’re replacing aging components that are failing This is the most common repair we do Usually brings a receiver back to like-new condition
Major repairs (transformer issues, extensive board work, hard-to-find parts): $400–$1,000+ These take time and specialized knowledge We might need to source parts from multiple suppliers Could take 2–3 weeks if we’re waiting on a specific part
Don’t – fix – it territory ($1,000+): This is when the repair cost exceeds the realistic market value of the unit. Unless there’s serious sentimental value, it doesn’t make financial sense.
The Real Cost You’re Not Thinking About
Repair isn’t just parts and labor. Your receiver might sit on my workbench for 2–3 weeks while I wait for a specific part. There’s real expertise involved in diagnosing vintage electronics, and there’s always the risk that once I open it up, I find additional problems we didn’t anticipate.
And there’s no guarantee. If a vintage component fails after we repair it, we can only control what we did. We can’t control how that unit was stored for the last 30 years.
So Here’s My Advice
Bring it in for a diagnostic. That costs about $50–75, and it gives you real information before you make any decision.
Don’t guess. Don’t hope. Don’t assume.
You’ll know what’s broken, what it will cost to fix, how long it will take, and whether it makes sense to proceed. Then you decide. Some people will say, “Yes, fix it. It was my dad’s receiver.” Others will say, “No thanks, I can buy a working one cheaper.” Both answers are right. You just need the facts first.
The worst repair decision is the one made without information. The second-worst is deciding to fix something that doesn’t make sense financially, then being surprised when it costs more than expected.
Get the diagnosis. Look at the numbers. Then decide. That’s how you know if that beautiful vintage receiver sitting in your garage is worth fixing.
What’s sitting in your basement or garage that you’ve been wondering about? Send us a message before you bring it in. We’ll tell you straight.
One of the most common questions we get is some version of: “How much is this going to cost me?”
It’s a fair question. Nobody wants to drop off their receiver and get hit with a surprise number. So let’s talk about it honestly.
There’s No Flat Rate — Here’s Why
Vintage electronics are not like changing your oil. Every unit is different. A Sansui receiver from 1975 has different components, different failure points, and different parts availability than a Rotel amplifier from the 1990s. What one unit needs — and what it takes to get it right — varies every single time.
That’s not a dodge. That’s just the reality of working on equipment that’s 30, 40, or 50 years old.
What You’re Actually Paying For
Diagnostic work. Before anything else, we need to figure out what’s actually wrong. That takes time and experience. We charge a diagnostic fee — and it’s typically lower than what you’ll find at a lot of other shops. We hear this regularly from customers who’ve been quoted elsewhere. If you approve the repair, that fee gets applied toward the total cost.
Parts. Some parts are easy to find. Others require sourcing from specialty suppliers, waiting on shipments, or tracking down components that simply aren’t made anymore. The cost and availability of parts directly affect what a repair runs.
Repair time. Straightforward repairs take less time. More complex issues — especially in older units with multiple failing components — take more. We don’t cut corners to speed things up, because that’s how you end up with a unit that works fine for a few months and then fails again.
Burn-in testing. Once the repair is done, we run the unit under load to confirm it’s performing the way it should before it leaves the shop. That step matters.
You Always Know the Cost Before We Proceed
Once we’ve diagnosed the unit, Dan calls you directly. He’ll explain what’s going on, what it needs, and what the repair will cost. You decide whether it’s worth it to you — no pressure, no assumptions.
If you want to move forward, great. If not, you pay the diagnostic fee and take your unit back. Either way, nothing happens without your approval first.
This is one of the things that separates us from shops that just do the work and hand you a bill.
Is a Deposit Required?
Not always. It depends on the situation. We’ll be straightforward with you about that when we talk through your repair.
When Do You Pay?
Payment is due at pickup, which — like drop-off — is always by appointment.
One thing worth mentioning: we’re a home-based shop with limited space. Between units being worked on and the inventory we have available for sale, our workspace fills up fast. That’s part of why we control intake carefully and schedule drop-offs the way we do. Once your repair is complete and you’ve been notified, we do ask that pickup happens in a reasonable timeframe. We’ve never had to push anyone on it, but it’s worth knowing upfront.
How Long Will It Take?
It depends on the unit and what it needs. Parts availability is often the biggest variable. Once we’ve had a chance to evaluate your equipment, we’ll give you an honest estimate — and we’ll keep you in the loop if anything changes along the way.
The Bottom Line
We know repairs can cost more than people expect. That’s partly because good repair work takes real time and real expertise — and partly because it hasn’t always been explained clearly.
We’d rather have that conversation up front. If you’ve got questions about a specific piece of gear before you commit to anything, reach out. We’re happy to talk it through.
When customers drop off vintage electronics for repair, they rarely see what really happens behind the scenes.
From the outside, it can feel simple: you bring the unit in, we fix the issue, and you pick it up when it’s ready. But the most important part of the repair happens in the middle — and it’s the part most people never see.
Understanding what goes on behind the scenes helps explain why vintage electronics repair doesn’t follow a straight, predictable timeline.
Diagnosis Is Only the Beginning
When a unit first arrives, we start with the known issue. Maybe it won’t power on, has no sound, or isn’t working properly.
But vintage electronics rarely deal with just one problem.
These components are often 30–60+ years old. Over time, heat, aging parts, previous repairs, and long periods of storage all take their toll. As work begins, additional issues may surface that weren’t visible during the initial inspection.
This doesn’t mean something went wrong. It means the repair process is doing exactly what it should.
The Parts Hunt
One of the biggest differences between modern electronics repair and vintage repair is parts availability.
Many of the components used in vintage equipment haven’t been manufactured for decades. There is no warehouse full of replacements waiting on a shelf.
Finding the right part often involves:
Searching multiple specialty suppliers
Checking availability from trusted sources
Waiting on shipping or backorders
Testing replacement parts before installation
Occasionally, sourcing parts from donor units
Not every replacement part is equal, and quality matters. Using the right component helps ensure the repair lasts and performs the way it should.
This entire process happens quietly in the background, but it plays a huge role in every successful repair.
Repairs Don’t Happen in a Straight Line
Once parts arrive and repairs begin, the work still isn’t finished.
Vintage equipment needs to be carefully tested and observed. This often includes:
Running the unit through multiple tests
Allowing time for heat cycles and normal operation
Making adjustments as the equipment stabilizes
Re-testing to confirm consistent performance
Sometimes a repair reveals additional symptoms only after the original issue is resolved. This is normal with vintage electronics and is part of making sure the unit is reliable when it goes back home.
Why Quality Repair Is a Responsibility
When we perform a repair, we stand behind the work we’ve done. That responsibility means taking the time to do the job carefully and correctly.
Rushing a repair increases the risk of missed issues, unreliable performance, or repeat problems later. Careful testing and observation help protect your equipment and your investment.
Our goal is always to return equipment that performs as it should — not just for the moment, but for the long term.
Trusting the Process
We understand how exciting it is to get vintage equipment back in your system and enjoy it again. We also see firsthand how much care and passion go into this hobby when we attend events like the Vintage Electronics Expo.
The work that happens between drop-off and pickup may be invisible, but it’s where the most important part of the repair takes place.
We truly appreciate the customers who trust the process and value careful, quality repair work.
Sometimes a unit is completely dead. At other times, it was sold as “working,” but it doesn’t actually function as it should. A lot of equipment is bought through online marketplaces with the expectation that it’s ready to use, only to discover problems once it’s powered up — or once it’s put into regular use.
Understanding What’s Really Going On
Before I can even think about how a unit is supposed to operate, I usually have to spend time figuring out what’s actually going on. That means sorting out whether it was misrepresented, partially working, previously modified, or affected by an attempted fix. In many cases, the first step isn’t repair at all — it’s verification.
A common situation is a unit that “sort of works.” It might play fine at low volume, but distort when pushed. It may behave normally when cold, then start acting up as it warms. Sometimes everything seems fine until a control is touched or a different input is used. These are the kinds of issues that don’t show up in a quick test, but they matter if the equipment is going to be used regularly.
When DIY Attempts Add Complexity
A lot of people try to save money by following a YouTube video. Sometimes that works. A lot of times it doesn’t. Without specific knowledge of how a particular brand or model behaves, it’s easy to create new problems while trying to solve the original one. What looked like a small issue can turn into a longer diagnostic process — and more time on the bench.
Why Brand and Model Knowledge Matters
Vintage electronics aren’t standardized the way modern equipment is. Different brands — and even different production runs of the same model — can behave very differently. Controls, tolerances, and circuit layouts all matter. Knowing what’s normal for a specific unit helps narrow down problems faster and prevents unnecessary adjustments that could create new issues.
A Real Example from the Bench
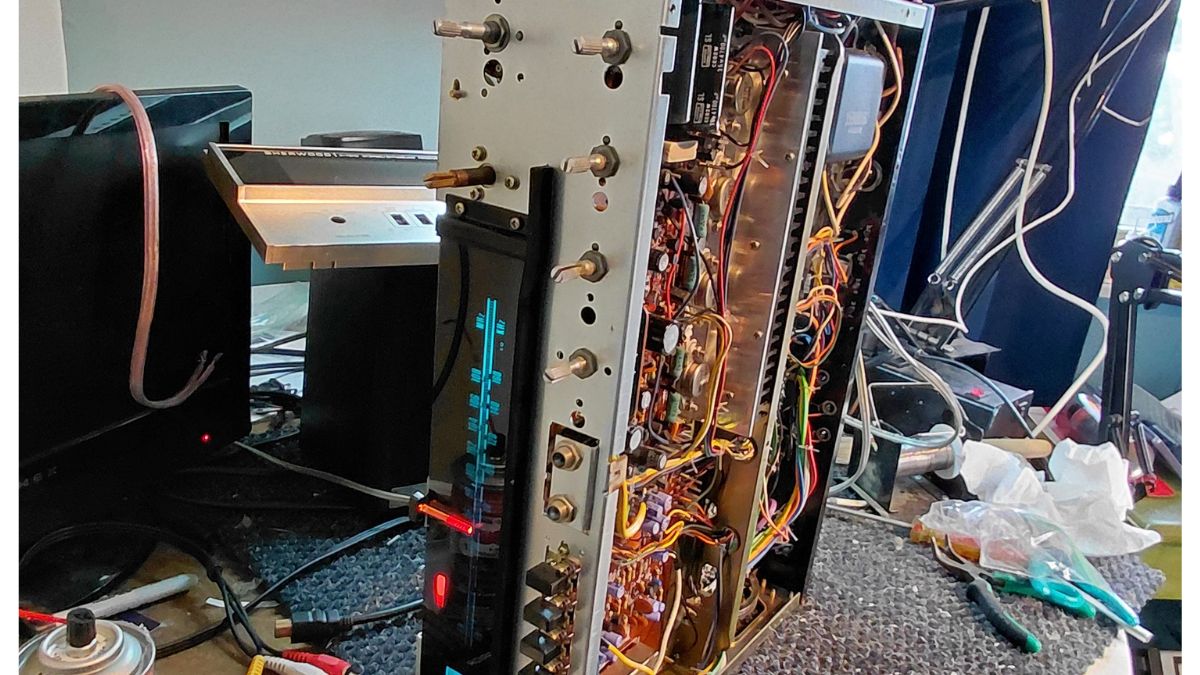
A recent example is a Sherwood S-7210 receiver that was on the bench. Like many units of that era, it came in with more than one issue to evaluate. One of the problems involved the on/off volume control — not something that was simply replaced, but repaired at the component level. Being able to do that requires understanding how the control is constructed, how it fails over time, and how it interacts with the rest of the circuit. Work like this isn’t about swapping parts until something works; it’s about addressing the actual failure while preserving how the unit was designed to function.
Judgment Comes with Time
When you’ve worked on enough of these units, you start to recognize patterns. You learn which behaviors are harmless and which ones are early warning signs. You also learn when not to push a unit further than it wants to go. A lot of damage doesn’t happen all at once. It happens when something delicate is stressed just a little too far, or when a shortcut seems fine in the moment.
Careful hands are important, but they’re not enough on their own.
Protecting the Equipment Long-Term
A big part of my job is making judgment calls. Not every option is a good option, even if it’s technically possible. Sometimes the best decision is the one that protects the unit long-term, not the one that looks impressive or promises quick results.
From a customer’s standpoint, that usually shows up as fewer surprises. It means realistic expectations, honest conversations, and work that’s done to keep the equipment stable and usable — not just “fixed for now.”
Vintage electronics don’t forgive guesswork. They reward patience, familiarity, and restraint. That only comes from time at the bench, seeing what holds up and what doesn’t.